Table of Contents
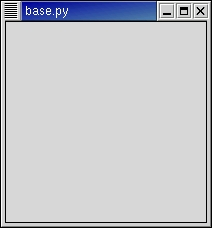
To begin our introduction to PyGTK, we'll start with the simplest program possible. This program (base.py) will create a 200x200 pixel window and has no way of exiting except to be killed by using the shell.
    1   #!/usr/bin/env python
    2
    3   # example base.py
    4
    5   import pygtk
    6   pygtk.require('2.0')
    7   import gtk
    8
    9   class Base:
   10       def __init__(self):
   11           self.window = gtk.Window(gtk.WINDOW_TOPLEVEL)
   12           self.window.show()
   13
   14       def main(self):
   15           gtk.main()
   16
   17   print __name__
   18   if __name__ == "__main__":
   19       base = Base()
   20       base.main()
|
You can run the above program using:
python base.py |
If base.py is made executable and can be found in your PATH, it can be run using:
base.py |
Line 1 will invoke python to run base.py in this case. Lines 5-6 help differentiate between various versions of PyGTK that may be installed on your system. These lines specify that we want to use PyGTK version 2.0 which covers all versions of PyGTK with the major number 2. This prevents the program from using the earlier version of PyGTK if it happens to be installed on your system. Lines 18-20 check if the __name__ variable is "__main__" which indicates that the program is being run directly from python and not being imported into a running python interpreter. In this case the program creates a new instance of the Base class and saves a reference to it in the variable base. It then invokes the method main() to start the GTK+ event processing loop.
A window similar to Figure 2.1, “Simple PyGTK Window” should popup on your display.
The first line allows the program base.py to be invoked from a Linux or Unix shell program assuming that python is found your PATH. This line will be the first line in all the example programs.
Lines 5-7 import the PyGTK 2 module and initializes the GTK+ environment. The PyGTK module defines the python interfaces to the GTK+ functions that will be used in the program. For those familiar with GTK+ the initialization includes calling the gtk_init() function. This sets up a few things for us such as the default visual and color map, default signal handlers, and checks the arguments passed to your application on the command line, looking for one or more of the following:
- --gtk-module
- --g-fatal-warnings
- --gtk-debug
- --gtk-no-debug
- --gdk-debug
- --gdk-no-debug
- --display
- --sync
- --name
- --class
It removes these from the argument list, leaving anything it does not recognize for your application to parse or ignore. These are a set of standard arguments accepted by all GTK+ applications.
Lines 9-15 define a python class named Base that defines a class instance initialization method __init__(). The __init__() function creates a top level window (line 11) and directs GTK+ to display it (line 12). The gtk.Window is created in line 11 with the argument gtk.WINDOW_TOPLEVEL that specifies that we want the window to undergo window manager decoration and placement. Rather than create a window of 0x0 size, a window without children is set to 200x200 by default so you can still manipulate it.
Lines 14-15 define the main() method that calls the PyGTK main() function that, in turn, invokes the GTK+ main event processing loop to handle mouse and keyboard events as well as window events.
Lines 18-20 allow the program to start automatically if called directly or passed as an argument to the python interpreter; in these cases the program name contained in the python variable __name__ will be the string "__main__" and the code in lines 18-20 will be executed. If the program is loaded into a running python interpreter using an import statement, lines 18-20 will not be executed.
Line 19 creates an instance of the Base class called base. A gtk.Window is created and displayed as a result.
Line 20 calls the main() method of the Base class which starts the GTK+ event processing loop. When control reaches this point, GTK+ will sleep waiting for X events (such as button or key presses), timeouts, or file IO notifications to occur. In our simple example, however, events are ignored.
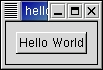
Now for a program with a widget (a button). It's the PyGTK version of the classic hello world program (helloworld.py ).
    1   #!/usr/bin/env python
    2
    3   # example helloworld.py
    4
    5   import pygtk
    6   pygtk.require('2.0')
    7   import gtk
    8
    9   class HelloWorld:
   10
   11       # This is a callback function. The data arguments are ignored
   12       # in this example. More on callbacks below.
   13       def hello(self, widget, data=None):
   14           print "Hello World"
   15
   16       def delete_event(self, widget, event, data=None):
   17           # If you return FALSE in the "delete_event" signal handler,
   18           # GTK will emit the "destroy" signal. Returning TRUE means
   19           # you don't want the window to be destroyed.
   20           # This is useful for popping up 'are you sure you want to quit?'
   21           # type dialogs.
   22           print "delete event occurred"
   23
   24           # Change FALSE to TRUE and the main window will not be destroyed
   25           # with a "delete_event".
   26           return False
   27
   28       # Another callback
   29       def destroy(self, widget, data=None):
   30           gtk.main_quit()
   31
   32       def __init__(self):
   33           # create a new window
   34           self.window = gtk.Window(gtk.WINDOW_TOPLEVEL)
   35
   36           # When the window is given the "delete_event" signal (this is given
   37           # by the window manager, usually by the "close" option, or on the
   38           # titlebar), we ask it to call the delete_event () function
   39           # as defined above. The data passed to the callback
   40           # function is NULL and is ignored in the callback function.
   41           self.window.connect("delete_event", self.delete_event)
   42
   43           # Here we connect the "destroy" event to a signal handler.
   44           # This event occurs when we call gtk_widget_destroy() on the window,
   45           # or if we return FALSE in the "delete_event" callback.
   46           self.window.connect("destroy", self.destroy)
   47
   48           # Sets the border width of the window.
   49           self.window.set_border_width(10)
   50
   51           # Creates a new button with the label "Hello World".
   52           self.button = gtk.Button("Hello World")
   53
   54           # When the button receives the "clicked" signal, it will call the
   55           # function hello() passing it None as its argument.  The hello()
   56           # function is defined above.
   57           self.button.connect("clicked", self.hello, None)
   58
   59           # This will cause the window to be destroyed by calling
   60           # gtk_widget_destroy(window) when "clicked".  Again, the destroy
   61           # signal could come from here, or the window manager.
   62           self.button.connect_object("clicked", gtk.Widget.destroy, self.window)
   63
   64           # This packs the button into the window (a GTK container).
   65           self.window.add(self.button)
   66
   67           # The final step is to display this newly created widget.
   68           self.button.show()
   69
   70           # and the window
   71           self.window.show()
   72
   73       def main(self):
   74           # All PyGTK applications must have a gtk.main(). Control ends here
   75           # and waits for an event to occur (like a key press or mouse event).
   76           gtk.main()
   77
   78   # If the program is run directly or passed as an argument to the python
   79   # interpreter then create a HelloWorld instance and show it
   80   if __name__ == "__main__":
   81       hello = HelloWorld()
   82       hello.main()
|
Figure 2.2, “Hello World Example Program” shows the window created by helloworld.py.
The variables and functions that are defined in the PyGTK module are named as gtk.*. For example, the helloworld.py program uses:
False gtk.mainquit() gtk.Window() gtk.Button() |
from the PyGTK module. In future sections I will not specify the gtk module prefix but it will be assumed. The example programs will of course use the module prefixes.