Images are data structures that contain pictures. These pictures can be used in various places.
Images can be created from Pixbufs, Pixmaps, image files (e.g. XPM, PNG, JPEG, TIFF, etc.) and even animation files.
Images are created using the function:
image = gtk.Image() |
The image is then loaded using one of the following methods:
image.set_from_pixbuf(pixbuf) image.set_from_pixmap(pixmap, mask) image.set_from_image(image) image.set_from_file(filename) image.set_from_stock(stock_id, size) image.set_from_icon_set(icon_set, size) image.set_from_animation(animation) |
Where pixbuf is a gtk.gdk.Pixbuf; pixmap and mask are gtk.gdk.Pixmaps; image is a gtk.gdk.Image; stock_id is the name of a gtk.StockItem; icon_set is a gtk.IconSet; and, animation is a gtk.gdk.PixbufAnimation. the size argument is one of:
ICON_SIZE_MENU ICON_SIZE_SMALL_TOOLBAR ICON_SIZE_LARGE_TOOLBAR ICON_SIZE_BUTTON ICON_SIZE_DND ICON_SIZE_DIALOG |
The easiest way to create an image is using the set_from_file() method which automatically determines the image type and loads it.
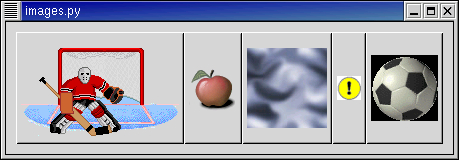
The program images.py illustrates loading various image types (goalie.gif, apple-red.png, chaos.jpg, important.tif, soccerball.gif) into images which are then put into buttons:
The source code is:
    1	#!/usr/bin/env python
    2
    3	# example images.py
    4
    5	import pygtk
    6	pygtk.require('2.0')
    7	import gtk
    8
    9	class ImagesExample:
   10	    # when invoked (via signal delete_event), terminates the application.
   11	    def close_application(self, widget, event, data=None):
   12	        gtk.main_quit()
   13	        return False
   14
   15	    # is invoked when the button is clicked.  It just prints a message.
   16	    def button_clicked(self, widget, data=None):
   17	        print "button %s clicked" % data
   18
   19	    def __init__(self):
   20	        # create the main window, and attach delete_event signal to terminating
   21	        # the application
   22	        window = gtk.Window(gtk.WINDOW_TOPLEVEL)
   23	        window.connect("delete_event", self.close_application)
   24	        window.set_border_width(10)
   25	        window.show()
   26
   27	        # a horizontal box to hold the buttons
   28	        hbox = gtk.HBox()
   29	        hbox.show()
   30	        window.add(hbox)
   31
   32	        pixbufanim = gtk.gdk.PixbufAnimation("goalie.gif")
   33	        image = gtk.Image()
   34	        image.set_from_animation(pixbufanim)
   35	        image.show()
   36	        # a button to contain the image widget
   37	        button = gtk.Button()
   38	        button.add(image)
   39	        button.show()
   40	        hbox.pack_start(button)
   41	        button.connect("clicked", self.button_clicked, "1")
   42
   43	        # create several images with data from files and load images into
   44	        # buttons
   45	        image = gtk.Image()
   46	        image.set_from_file("apple-red.png")
   47	        image.show()
   48	        # a button to contain the image widget
   49	        button = gtk.Button()
   50	        button.add(image)
   51	        button.show()
   52	        hbox.pack_start(button)
   53	        button.connect("clicked", self.button_clicked, "2")
   54
   55	        image = gtk.Image()
   56	        image.set_from_file("chaos.jpg")
   57	        image.show()
   58	        # a button to contain the image widget
   59	        button = gtk.Button()
   60	        button.add(image)
   61	        button.show()
   62	        hbox.pack_start(button)
   63	        button.connect("clicked", self.button_clicked, "3")
   64
   65	        image = gtk.Image()
   66	        image.set_from_file("important.tif")
   67	        image.show()
   68	        # a button to contain the image widget
   69	        button = gtk.Button()
   70	        button.add(image)
   71	        button.show()
   72	        hbox.pack_start(button)
   73	        button.connect("clicked", self.button_clicked, "4")
   74
   75	        image = gtk.Image()
   76	        image.set_from_file("soccerball.gif")
   77	        image.show()
   78	        # a button to contain the image widget
   79	        button = gtk.Button()
   80	        button.add(image)
   81	        button.show()
   82	        hbox.pack_start(button)
   83	        button.connect("clicked", self.button_clicked, "5")
   84
   85
   86	def main():
   87	    gtk.main()
   88	    return 0
   89
   90	if __name__ == "__main__":
   91	    ImagesExample()
   92	    main()
|
Pixmaps are data structures that contain pictures. These pictures can be used in various places, but most commonly as icons on the X desktop, or as cursors.
A pixmap which only has 2 colors is called a bitmap, and there are a few additional routines for handling this common special case.
To understand pixmaps, it would help to understand how X window system works. Under X, applications do not need to be running on the same computer that is interacting with the user. Instead, the various applications, called "clients", all communicate with a program which displays the graphics and handles the keyboard and mouse. This program which interacts directly with the user is called a "display server" or "X server." Since the communication might take place over a network, it's important to keep some information with the X server. Pixmaps, for example, are stored in the memory of the X server. This means that once pixmap values are set, they don't need to keep getting transmitted over the network; instead a command is sent to "display pixmap number XYZ here." Even if you aren't using X with GTK+ currently, using constructs such as Pixmaps will make your programs work acceptably under X.
To use pixmaps in PyGTK, we must first build a gtk.gdk.Pixmap using gtk.gdk functions in PyGTK. Pixmaps can either be created from in-memory data, or from data read from a file. We'll go through each of the calls to create a pixmap.
pixmap = gtk.gdk.pixmap_create_from_data(window, data, width, height, depth, fg, bg) |
This routine is used to create a pixmap from data in memory with the color depth given by depth. If depth is -1 the color depth is derived from the depth of window. Each pixel uses depth bits of data to represent the color. Width and height are in pixels. The window argument must refer to a realized gtk.gdk.Window, since a pixmap's resources are meaningful only in the context of the screen where it is to be displayed. fg and bg are the foreground and background colors of the pixmap.
Pixmaps can be created from XPM files using:
pixmap, mask = gtk.gdk.pixmap_create_from_xpm(window, transparent_color, filename) |
XPM format is a readable pixmap representation for the X Window System. It is widely used and many different utilities are available for creating image files in this format. In the pixmap_create_from_xpm() function the first argument is a gtk.gdk.Window type. (Most GTK+ widgets have an underlying gtk.gdk.Window which can be retrieved by using the widget's window attribute.) The file, specified by filename, must contain an image in the XPM format and the image is loaded into the pixmap structure. The mask is a bitmap that specifies which bits of pixmap are opaque; it is created by the function. All other pixels are colored using the color specified by transparent_color. An example using this function is below.
Pixmaps can also be created from data in memory using the function:
pixmap, mask = gtk.gdk.pixmap_create_from_xpm_d(window, transparent_color, data) |
Small images can be incorporated into a program as data in the XPM format using the above function. A pixmap is created using this data, instead of reading it from a file. An example of such data is:
xpm_data = [ "16 16 3 1", " c None", ". c #000000000000", "X c #FFFFFFFFFFFF", " ", " ...... ", " .XXX.X. ", " .XXX.XX. ", " .XXX.XXX. ", " .XXX..... ", " .XXXXXXX. ", " .XXXXXXX. ", " .XXXXXXX. ", " .XXXXXXX. ", " .XXXXXXX. ", " .XXXXXXX. ", " .XXXXXXX. ", " ......... ", " ", " " ] |
The final way to create a blank pixmap suitable for drawing operations is:
pixmap = gtk.gdk.Pixmap(window, width, height, depth=-1) |
window is either a gtk.gdk.Window. or None. If window is a gtk.gdk.Window then depth can be -1 to indicate that the depth should be determined from the window. If window is None then the depth must be specified.
The pixmap.py program is an example of using a pixmap in a button. Figure 9.6, “Pixmap in a Button Example” shows the result:

The source code is:
    1	#!/usr/bin/env python
    2
    3	# example pixmap.py
    4
    5	import pygtk
    6	pygtk.require('2.0')
    7	import gtk
    8
    9	# XPM data of Open-File icon
   10	xpm_data = [
   11	"16 16 3 1",
   12	"       c None",
   13	".      c #000000000000",
   14	"X      c #FFFFFFFFFFFF",
   15	"                ",
   16	"   ......       ",
   17	"   .XXX.X.      ",
   18	"   .XXX.XX.     ",
   19	"   .XXX.XXX.    ",
   20	"   .XXX.....    ",
   21	"   .XXXXXXX.    ",
   22	"   .XXXXXXX.    ",
   23	"   .XXXXXXX.    ",
   24	"   .XXXXXXX.    ",
   25	"   .XXXXXXX.    ",
   26	"   .XXXXXXX.    ",
   27	"   .XXXXXXX.    ",
   28	"   .........    ",
   29	"                ",
   30	"                "
   31	]
   32
   33	class PixmapExample:
   34	    # when invoked (via signal delete_event), terminates the application.
   35	    def close_application(self, widget, event, data=None):
   36	        gtk.main_quit()
   37	        return False
   38
   39	    # is invoked when the button is clicked.  It just prints a message.
   40	    def button_clicked(self, widget, data=None):
   41	        print "button clicked"
   42
   43	    def __init__(self):
   44	        # create the main window, and attach delete_event signal to terminating
   45	        # the application
   46	        window = gtk.Window(gtk.WINDOW_TOPLEVEL)
   47	        window.connect("delete_event", self.close_application)
   48	        window.set_border_width(10)
   49	        window.show()
   50
   51	        # now for the pixmap from XPM data
   52	        pixmap, mask = gtk.gdk.pixmap_create_from_xpm_d(window.window,
   53	                                                        None,
   54	                                                        xpm_data)
   55
   56	        # an image widget to contain the pixmap
   57	        image = gtk.Image()
   58	        image.set_from_pixmap(pixmap, mask)
   59	        image.show()
   60
   61	        # a button to contain the image widget
   62	        button = gtk.Button()
   63	        button.add(image)
   64	        window.add(button)
   65	        button.show()
   66
   67	        button.connect("clicked", self.button_clicked)
   68
   69	def main():
   70	    gtk.main()
   71	    return 0
   72
   73	if __name__ == "__main__":
   74	    PixmapExample()
   75	    main()
|
A disadvantage of using pixmaps is that the displayed object is always rectangular, regardless of the image. We would like to create desktops and applications with icons that have more natural shapes. For example, for a game interface, we would like to have round buttons to push. The way to do this is using shaped windows.
A shaped window is simply a pixmap where the background pixels are transparent. This way, when the background image is multi-colored, we don't overwrite it with a rectangular, non-matching border around our icon. The wheelbarrow.py example program displays a full wheelbarrow image on the desktop. Figure 9.7, “Wheelbarrow Example Shaped Window” shows the wheelbarrow over a terminal window:
The source code for wheelbarrow.py is:
    1	#!/usr/bin/env python
    2
    3	# example wheelbarrow.py
    4
    5	import pygtk
    6	pygtk.require('2.0')
    7	import gtk
    8
    9	# XPM
   10	WheelbarrowFull_xpm = [
   11	"48 48 64 1",
   12	"       c None",
   13	".      c #DF7DCF3CC71B",
   14	"X      c #965875D669A6",
   15	"o      c #71C671C671C6",
   16	"O      c #A699A289A699",
   17	"+      c #965892489658",
   18	"@      c #8E38410330C2",
   19	"#      c #D75C7DF769A6",
   20	"$      c #F7DECF3CC71B",
   21	"%      c #96588A288E38",
   22	"&      c #A69992489E79",
   23	"*      c #8E3886178E38",
   24	"=      c #104008200820",
   25	"-      c #596510401040",
   26	";      c #C71B30C230C2",
   27	":      c #C71B9A699658",
   28	">      c #618561856185",
   29	",      c #20811C712081",
   30	"<      c #104000000000",
   31	"1      c #861720812081",
   32	"2      c #DF7D4D344103",
   33	"3      c #79E769A671C6",
   34	"4      c #861782078617",
   35	"5      c #41033CF34103",
   36	"6      c #000000000000",
   37	"7      c #49241C711040",
   38	"8      c #492445144924",
   39	"9      c #082008200820",
   40	"0      c #69A618611861",
   41	"q      c #B6DA71C65144",
   42	"w      c #410330C238E3",
   43	"e      c #CF3CBAEAB6DA",
   44	"r      c #71C6451430C2",
   45	"t      c #EFBEDB6CD75C",
   46	"y      c #28A208200820",
   47	"u      c #186110401040",
   48	"i      c #596528A21861",
   49	"p      c #71C661855965",
   50	"a      c #A69996589658",
   51	"s      c #30C228A230C2",
   52	"d      c #BEFBA289AEBA",
   53	"f      c #596545145144",
   54	"g      c #30C230C230C2",
   55	"h      c #8E3882078617",
   56	"j      c #208118612081",
   57	"k      c #38E30C300820",
   58	"l      c #30C2208128A2",
   59	"z      c #38E328A238E3",
   60	"x      c #514438E34924",
   61	"c      c #618555555965",
   62	"v      c #30C2208130C2",
   63	"b      c #38E328A230C2",
   64	"n      c #28A228A228A2",
   65	"m      c #41032CB228A2",
   66	"M      c #104010401040",
   67	"N      c #492438E34103",
   68	"B      c #28A2208128A2",
   69	"V      c #A699596538E3",
   70	"C      c #30C21C711040",
   71	"Z      c #30C218611040",
   72	"A      c #965865955965",
   73	"S      c #618534D32081",
   74	"D      c #38E31C711040",
   75	"F      c #082000000820",
   76	"                                                ",
   77	"          .XoO                                  ",
   78	"         +@#$%o&                                ",
   79	"         *=-;#::o+                              ",
   80	"           >,<12#:34                            ",
   81	"             45671#:X3                          ",
   82	"               +89<02qwo                        ",
   83	"e*                >,67;ro                       ",
   84	"ty>                 459@>+&&                    ",
   85	"$2u+                  ><ipas8*                  ",
   86	"%$;=*                *3:.Xa.dfg>                ",
   87	"Oh$;ya             *3d.a8j,Xe.d3g8+             ",
   88	" Oh$;ka          *3d$a8lz,,xxc:.e3g54           ",
   89	"  Oh$;kO       *pd$%svbzz,sxxxxfX..&wn>         ",
   90	"   Oh$@mO    *3dthwlsslszjzxxxxxxx3:td8M4       ",
   91	"    Oh$@g& *3d$XNlvvvlllm,mNwxxxxxxxfa.:,B*     ",
   92	"     Oh$@,Od.czlllllzlmmqV@V#V@fxxxxxxxf:%j5&   ",
   93	"      Oh$1hd5lllslllCCZrV#r#:#2AxxxxxxxxxcdwM*  ",
   94	"       OXq6c.%8vvvllZZiqqApA:mq:Xxcpcxxxxxfdc9* ",
   95	"        2r<6gde3bllZZrVi7S@SV77A::qApxxxxxxfdcM ",
   96	"        :,q-6MN.dfmZZrrSS:#riirDSAX@Af5xxxxxfevo",
   97	"         +A26jguXtAZZZC7iDiCCrVVii7Cmmmxxxxxx%3g",
   98	"          *#16jszN..3DZZZZrCVSA2rZrV7Dmmwxxxx&en",
   99	"           p2yFvzssXe:fCZZCiiD7iiZDiDSSZwwxx8e*>",
  100	"           OA1<jzxwwc:$d%NDZZZZCCCZCCZZCmxxfd.B ",
  101	"            3206Bwxxszx%et.eaAp77m77mmmf3&eeeg* ",
  102	"             @26MvzxNzvlbwfpdettttttttttt.c,n&  ",
  103	"             *;16=lsNwwNwgsvslbwwvccc3pcfu<o    ",
  104	"              p;<69BvwwsszslllbBlllllllu<5+     ",
  105	"              OS0y6FBlvvvzvzss,u=Blllj=54       ",
  106	"               c1-699Blvlllllu7k96MMMg4         ",
  107	"               *10y8n6FjvllllB<166668           ",
  108	"                S-kg+>666<M<996-y6n<8*          ",
  109	"                p71=4 m69996kD8Z-66698&&        ",
  110	"                &i0ycm6n4 ogk17,0<6666g         ",
  111	"                 N-k-<>     >=01-kuu666>        ",
  112	"                 ,6ky&      &46-10ul,66,        ",
  113	"                 Ou0<>       o66y<ulw<66&       ",
  114	"                  *kk5       >66By7=xu664       ",
  115	"                   <<M4      466lj<Mxu66o       ",
  116	"                   *>>       +66uv,zN666*       ",
  117	"                              566,xxj669        ",
  118	"                              4666FF666>        ",
  119	"                               >966666M         ",
  120	"                                oM6668+         ",
  121	"                                  *4            ",
  122	"                                                ",
  123	"                                                "
  124	]
  125
  126	class WheelbarrowExample:
  127	    # When invoked (via signal delete_event), terminates the application
  128	    def close_application(self, widget, event, data=None):
  129	        gtk.main_quit()
  130	        return False
  131
  132	    def __init__(self):
  133	        # Create the main window, and attach delete_event signal to terminate
  134	        # the application.  Note that the main window will not have a titlebar
  135	        # since we're making it a popup.
  136	        window = gtk.Window(gtk.WINDOW_POPUP)
  137	        window.connect("delete_event", self.close_application)
  138	        window.set_events(window.get_events() | gtk.gdk.BUTTON_PRESS_MASK)
  139	        window.connect("button_press_event", self.close_application)
  140	        window.show()
  141
  142	        # Now for the pixmap and the image widget
  143	        pixmap, mask = gtk.gdk.pixmap_create_from_xpm_d(
  144	            window.window, None, WheelbarrowFull_xpm)
  145	        image = gtk.Image()
  146	        image.set_from_pixmap(pixmap, mask)
  147	        image.show()
  148
  149	        # To display the image, we use a fixed widget to place the image
  150	        fixed = gtk.Fixed()
  151	        fixed.set_size_request(200, 200)
  152	        fixed.put(image, 0, 0)
  153	        window.add(fixed)
  154	        fixed.show()
  155
  156	        # This masks out everything except for the image itself
  157	        window.shape_combine_mask(mask, 0, 0)
  158
  159	        # show the window
  160	        window.set_position(gtk.WIN_POS_CENTER_ALWAYS)
  161	        window.show()
  162
  163	def main():
  164	    gtk.main()
  165	    return 0
  166
  167	if __name__ == "__main__":
  168	    WheelbarrowExample()
  169	    main()
|
To make the wheelbarrow image sensitive, we attached the "button_press_event" signal to make the program exit. Lines 138-139 make the picture sensitive to a mouse button being pressed and connect the close_application() method.